Thursday, March 31, 2016

Elves & Dwarves vs. Orcs & Goblins, Battle for the EverFrost

For the first battle of the Campaign for the Darkened Wood, a series of battles played with the Savage Worlds Showdown rules, a force of Orcs and Goblins will face off with a coalition of Wood Elves and Dwarves that seek to prevent the Orc Shaman from harnessing the dark energies of a place rich in magical power.

Deep in the heart of the Darkened Wood, there lies a mystical place touched by unknown and mysterious magics.  This place, the EverFrost, features three pillars of blue, frozen stone that stays frigid in spite of its placement in a lush and green forest.  A force of Orcs and Goblins, led by Chieftain Urg and Shaman Grimnobb, ventured to the EverFrost on the eve of the Summer Solstice, when the contrast between the summer heat and the cold of the EverFrost pillars will heighten the power that Grimnobb can direct into a devious spell.  Sensing a disturbance in the magical realm based on Grimnobb's dark designs, Dwarf mage Forgoth Greybeard and warrior Erik the Berserker lead a Dwarf warband that unites with a similarly-motivated band of Wood Elves, led by Chieftain Eofar and Swordmaster Turwyn, hoping to keep dark magics out of this world.

The goal of each warband is to have their mage standing on the EverFrost on the last turn of the game.  Now, on to the tale of the tape:

The Elf-Dwarf coalition.  Elves on the left, led by Chieftain Eofar and Swordmaster Turwyn.  Dwarves on the right, led by mage Forgoth Greybeard and warrior Erik the Berserker.
Orc and Goblin warband.  Chieftain Urg (still a work in progress paint job) and Shaman Grimnobb in the center.
Positions of the warbands at the game's outset.
Turn 1:
Orc and Goblin forces drew, on average, higher initiative and raced for the EverFrost pillars and into nearby woods to provide cover from notoriously accurate Elven arrows.

The fear of arrow fire was not irrational; Elven archers advanced and fired a long-range volley at the Goblins on the Green Horde left, connecting with one arrow.  The Goblins spent a benny to soak this damage and keep the unit moving at the same pace.  Another volley, this one aimed at Orcs, sent two arrows bouncing off of Orc shields.
Position of the forces at the end of Turn 1.  The two minis out in front of the Elven line are their Chieftain and Swordmaster.
Turn 2:
The Green Horde largely led the way with initiative again.  The Dwarven Mage fired a bolt of magic that hit an Orc but failed to wound.

The Orc shaman and his retinue moved forward to mount the rocks at the edge of the EverFrost, and the archer accompanying the mage fired an arrow at an opposite Dwarf that fell harmlessly to the earth.

The Elves and Dwarves continued to advance toward the EverFrost, with a number of arrows fired and failing to connect.  The Elven Chieftain and Swordmaster were able to mount the rocks around the EverFrost.
View from the Elven left flank as their Chieftain and Swordmaster mount the rocks around the EverFrost.
Turn 3:
In the Green Horde initiative draws, two Jokers came up.  On the resulting roll for associated random events, the Orc player designated a unit of Elven archers to suffer a -2 on all rolls this round.  This would prove fortuitous.

The Elven Chieftain, the best archer on the field, moved to a position of advantage on the EverFrost rocks and fired an arrow into the Orc shaman, causing two wounds to the mage.  He would recover one of them with a benny-driven Soak roll.  This critical shot threatened the Orcs' chances for victory - with no mage standing on the EverFrost rocks at games' end, they would lose those victory points.

Both sides continued to move toward each other.  The Orc chieftain moved to a place of partial cover between EverFrost pillars, and the temporarily hindered Elven archer unit took some shots at him.  The -2 modifier meant the difference between him hits and misses.
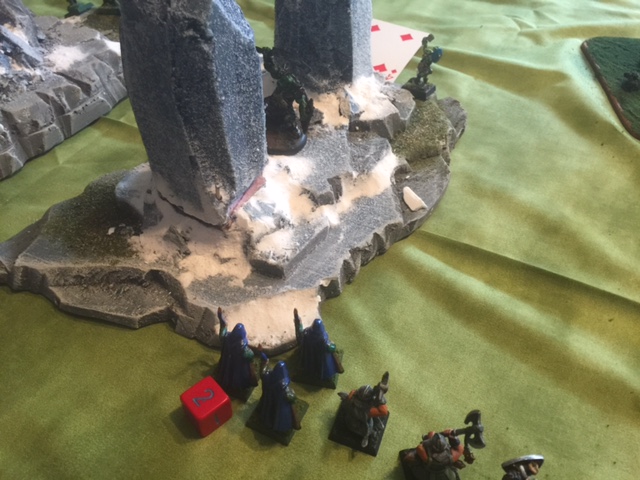
The -2 modifier applied this turn to this Elven archer unit saved the Orc chieftain from being wounded.
The Goblins on the Green Horde left moved all the way around a patch of woods to try to envelope the Elf/Dwarf right flank.

The Orc Shaman moved forward and cast a Blast spell with great success in spite of his lingering wound.  He inflicted one wound on the Elven chieftain, and two on the Swordmaster.  They both spent bennies to Soak wounds.
Blast marker of the Orc shaman's spell completely covered the Elven chieftain and swordmaster.
Turn 4:
Positions at the start of Turn 4.  Flanking Goblins on either side of the Dwarf/Elf line, seeking to find a maneuver advantage.
The Orc left charged into combat with the Dwarven hero Erik the Berserker and two of his brethren.
The Orc and Dwarf lines meet alongside the EverFrost.
The three Orcs managed to roll three 1s for their attacks.  An Orc charge against the lead Elven archer similarly failed.
The Orcs come up snake eyes.  And another 1.
On top of the Everfrost, an Orc spearman charged forward and stabbed Eofar, the Elven chieftain, inflicting two wounds, with one being soaked.  Eofar's counter-thrust missed the mark.

Turwyn, the Elven swordmaster, leapt forward and scored the first kill of the game.  Bringing his greatsword crashing down on an Orc, he killed the beast instantly, and its lifeless body fell from rocks around the EverFrost.
Turwyn, Elven Swordmaster, vanquishes an Orc that falls dead to the earth next to the EverFrost.
The Goblins' run around the patch woods on the Elf/Dwarf right brought them almost within striking distance of the Dwarven rear, but the Dwarven unit, led by Greybeard the mage, responded with a magic missile.
The closest any Goblin came to a successful flanking maneuver.
One of the Goblins fell to the earth dead, a smoking crater in its chest.
The lead flanking Goblin falls dead, breaking the unit's momentum.
Back on the Elven left, a flurry of arrows brought down one and shook another of the Goblins seeking to charge out of the woods and into the Elven flank.
Accurate Elven arrows repulse a parallel flanking attack on the other side of the field.
Turn 5:

The battle swung toward the Elves and Dwarves.  All Orc and Goblin units that took casualties failed their Spirit checks (morale rolls) and started their flight from the field.  The Orc and Goblin right flank, including their shaman, began to flee.  The two Orcs engaged in combat with the Elven chieftain and swordmaster fell to sword blows as they tried to flee, and Elven arrows rained down on the Orc shaman as he fled, inflicting more wounds on him.
The Orc Shaman flees the field as his retinue broke, only to receive harrying arrow fire as he tries to leave the battle.
Combat on the Elven/Dwarven right proved rather inconclusive, and we decided to call the game at that point.  The Orc shaman was going to either flee the field or be shot down in a hail of Elven arrows in the next turn, either outcome fatal to the Orcs' hopes for victory.
The Orc line breaks and flees the field.
Post-battle impressions:
1.  The Savage Worlds Showdown system works well.  I thought that the bennies (re-roll tokens) would be a nuisance, but the concept has grown on me.  I can see how strategic use of them can really influence the course of a game.
2.  Some models need to have stats adjusted.  The Orcs had a d6 fighting skill, which made hits on some models all but impossible.  Some or all need to be shifted to a d8 fighting skill.
3.  The game was fun, and, with a few more under our belt the system should play pretty quickly.

Sunday, March 20, 2016

Beastmen vs. Wood Elves, Savage Worlds Showdown

We're back, and with a whole new take on fantasy skirmish.  After my somewhat less-than-satisfying experience with my Beastmen vs. Wood Elves in the Song of Blades and Heroes rules, I set out to try the matter again with the Savage Worlds ruleset ... more specifically, with their Showdown rules that take away RPG-useful stats and boil everything down more simply to a tabletop wargame.

Same as last time, I set out three treasure locations, with Elven and Beastmen forces squaring off opposite each other with the prospective treasure locations in between, and each location had a 1/3 chance of being the treasure's hiding spot.  
Layout from the Elves' perspective.  Three prospective treasure sites at the mid-point of the board.
The forces were balanced much differently.  Last time, the Elves were overpriced to the point of being more expensive than the Beastmen.  Not so this time.  A Beastman force of one chieftain and four followers priced out to 105 points.  For 118 points, the Elves had a chieftain and Swordsman (both Wild Cards) and eight archers.
The Beastman force.
The Elven force.  A whole lot more guys than were had under the SoBH system.
So, here goes:

Turn 1:
Beastmen won initiative overall.  I was using Minotaur stats for the Beastmen (which may seem like a bit much, but deal with it), which gave them a Pace (movement) of 8" each, plus a 1d10" if they run.

The Beastmen move distance put two of three of their groups already in contact with the three possible treasure locations.  The Elves opened fire with their bows at this point, all at -2 for their running, and needing a 6+ to hit.

Shooting on the Elven left put four arrows into one of the opposing Beastmen, but none proved effective against the beasts.  Arrow fire on the Elven right proved likewise ineffective.
Both sides advance to the three possible treasure sites.  The Beastmens' superior movement rates takes them up to the treasure sites in two of three cases.
Turn 2:
The Elven right took initiative, putting one successful arrow into a Beastman.  With an astounding series of damage rolls, the beast fell to the ground, out of the fight.  His compatriot (a unit of only two Beastmen) failed his Spirit check and proved Shaken.   The Elven Swordmaster moved forward to take advantage of this and lay the beast low, but was unable to.

The Elven left proved likewise ineffective - the arrows of all Elves (including Eofar, the chieftain, who stayed stationary to gain a +2 aiming advantage but rolled a 1) failed to connect to vulnerable Beastman flesh.

The Beastman chieftain advanced to the center position, while the Beastmen opposite the Elven left were comfortable enough under the hail of ineffective arrow fire to check their possible treasure position and determine that their objective did not contain the treasure trove.

Turn 3:

The Elven left took initiative and a hail of arrows brought one of the opposite Beastmen down.  The sole Beastman remaining opposite the Elven left passed a Spirit check and stayed on the field.
Elven arrows fell one of the two Beastmen on the Elven left.
On the Elven right, the Elven Swordmaster moved into combat with the Beastman at Treasure Site 3.  Using his Improved Flurry trait (two attacks, no penalty) he scored a well-placed blow and laid low his opponent.
The Elven swordmaster bests a beastman.  The battle clearly swings to the Elves.

Strategic view of the battle from the Elves' viewpoint.  Arrows on the Elven left reduce Beastmen while the Elven swordmaster charges forward on the Elven right and slays his remaining opponent.
Things were looking grim for the Beastmen.  Reduced now to 2 out of their original 5, they took a force-wide (if you can call it that) morale check.  I don't see that in the Showdown rules, but it seems a sensible house rule.  The Beastman chieftain passed his check, but the last of his  followers failed his.

At this point, the Beastmen routed and headed for the hills.  The lackey who failed his Spirit roll for a morale check recovered from being Shaken (I may have done this wrong - it may be that he was supposed to stay Shaken the rest of this turn) and rolled a 10 for his run roll, taking him all the way to the edge of the board.  The Beastman chieftain, however, only rolled a 3 and fell victim to a hail of Elven arrows as he fled.  Two connected, one wounded.

Turn 4:

The Beastman chieftain failed to get out of a Shaken state and shambled to the edge of the map while his compatriot successfully fled.  The Elves gave chase and fired arrows as they did so, and with an astounding chain of rolls managed to throw four more wounds into the fleeing Beastman leader.  Wild Cards (Player Characters or champions in Savage Worlds Showdown) only have four wounds, so he was down and out of the fight.  A sweeping victory for the Elves!
Strategic view of the Elven chase of the Beastmen from the field.  A hail of arrows pincushions the Beastman chieftain.
Reverse view of the field from the Beastman chieftain's (corpse's) view.
A few thoughts:
1.  The system is far more nuanced than Song of Blades and Heroes, particularly with regard to missile attacks.  The possibility of exploding dice means that, even with unlikely shots getting through the superior Toughness of the Beastmen, it did happen.  This is realistic and I like it.  

2.  I did the Beastmen a disservice by not placing patches of woods that blocked arrows entirely.  This worked greatly to the Elves' favor.  Will have to keep that in mind in the future, especially when one side is composed almost wholly of archers/missile troops.

3.  The Beastmen stats seem off.  By the math of the game, as I understand it, they should have a Toughness of 8, but the basic book lists them as having a Toughness of 11.  I don't know how it would get there, but it would make sense, as I'm using Minotaur stats.  I'm thinking of changing it back to the suggested numbers, even if they don't add up as I understand them.

4.  To run Savage Worlds Showdown "right" - by which I mean with balanced factions - there's a bit more effort than there is in A Song of Blades and Heroes.  This is partly due to the complexity of the two systems - SoBH is stupid simple, while SW Showdown is near-RPG complex by design.  And it's more complicated by virtue of the fact that the spreadsheet available at Savage Worlds websites is okay for calculating, in broad terms, the value of a full faction.  It isn't great for tableside gameplay.  This (using the provided formulas, with cells switched around) is much more useful:

So, that's where my fantasy skirmish is.  Hope you enjoyed.  I did.

Edited to add;  I didn't use any Bennies (re-rolls, each side gets 3 per 100 points and two per Wild Card).  Had I done so, the Beastmen surely would've used them to Soak wounds and charge into contact with the Elves, and this might have been a different battle entirely.

Tuesday, February 16, 2016

Cheap 28mm Miniatures

Been spending a bit of time on ebay lately, assembling some minis for future gaming endeavors.  I'm surprised to see the low prices on some Games Workshop figurines - you could pay less than original retail for assembled and competently painted minis if you are patient.

One thing that I ran across was sets of miniatures for a Russian game, Castlecraft.  They come in sets with buildings or in blister packs of eight, with four minis from each of two sides (the factions vary from knights to barbarians to others such as orcs, etc.).  Including the cost of shipping from Russia, the price comes out to about $1.00 a mini!  I took a chance on a couple of packs, and was able to amass the loot pictured below.
The original packaging.  A knights versus barbarians pack.

Four knights, good for Song of Blades and Heroes or other fantasy skirmish games.

Four Roman legionnaires.  I hadn't planned on going historical, but it would be a chance to teach the boys about history and have fun while doing so.

Two sets of slightly different barbarians (similar enough to be part of the same warband, though) from two different blister packs.  I've wanted to build a barbarian warband, and now I've done it for eight bucks!
The minis have some flash on them that I'll have to trim off, but a size comparison shows them to be on par in height (though a bit stouter) than LoTR minis, and a bit smaller than the 'heroic' scale Reaper Bones minis.  They'll fit in just fine and come with beveled bases to boot - no additional basing necessary.  I may give some of these guys to the boys to paint.  For a dollar a piece, you just can't go wrong.

Tuesday, January 19, 2016

Beastmen vs Wood Elves, Song of Blades and Heroes

I put the first game of the year in the books with a quick bit of Song of Blades and Heroes between me and my better half.  The scenario, Treasure Hunt, comes from the main rule book, with the opposing parties racing to check three possible locations where treasure might be located.  If (based on a roll) the first two come up dry, then the treasure will be found at the third.

I took a faction of five Beastmen, who all activated on a roll of 3+ on a d6, and have a Combat value of 4 (added to their roll in a contested d6 vs. d6 encounter).  No special abilities, save my leader, who had the (obviously) Leader trait.
The boys/beasts, in all their glory.
My special lady friend took a group of four Wood Elves, who activate on 3+, have a Combat value of 3, were armed with bows, and could move through the woods without penalty (Forester trait).
The fey lads.
The stock Beastman clocks in at 40 points, the Wood Elf with bow at 50.  As the encounter played out, you'll see that this was a mismatch.  The Elves needed more numbers, not less, to offset the Beastman toughness, and this game gives particularly short shrift to missile troops.

The Field:
I started from the near side.  Click to embiggen and enjoy my labels.  Do the same with the rest of the pics below.
Turns 1-2:
The Beastmen won initiative and race toward the three potential treasure spots.  They made better progress than the Wood Elves, in spite of the heavily wooded areas, on account of some good luck with the dice on activation.

The Beastmen take an early lead in getting to potential treasure spots 2 and 3.
Turn 3:
Two of the Beastmen and the Wood Elf leader arrived at Treasure 2, in the middle of the field, at nearly the same time.

The Beastman who made it to Treasure 2 first discovered that the treasure wasn't there, but he and his buddy stuck around to face off with the Wood Elf leader.

The lead Beastman moved into contact with the Wood Elf leader, so that at the least the Elf wouldn't be able to move out of combat to another possible treasure location without offering the Beastman a "free hack."

The Wood Elf leader prevails in the early combat, but only to the extent of knocking down the lead Beastman.
Meanwhile, over at possible treasure location 3, a Beastman has discovered that the treasure wasn't here, either, but moved forward to likewise engage a nearby Elf in combat and tie down the enemy.
Turn 3:
As both sides now know that the treasure is at treasure spot 1, they all shift forces toward that location.

The Beastman leader leads the charge, racing toward treasure site 1.
As the Beastman leader completes his move to treasure site 1, the Beastman previously knocked down has gotten back to his feet, and another Beastman rushes to his side to gain a group combat advantage over the Elf leader. The Elf leader succumbs to a bad roll and enemy numbers.
Though the Wood Elf leader fell in combat, his followers all retreated just one movement, just enough to avoid leaving the field of combat.  They resumed the push for the treasure in his name.

Turn 4:
As the Beastman leader gathered up the treasure, the Wood Elves proved unable to slow their enemies' momentum in the contest.

As the Beastman leader successfully spends two actions picking up the treasure, a Wood Elf moves into the copse of trees and fires an arrow at the Beastman leader.  It failed to connect, and the Beastmen moved closer to victory.  Out of the picture, other Beastmen continued to move toward treasure location 1 to screen their leader's exit from the field.
 Turn 5:

As the Beastman leader made a successful move out of the copse of trees that had hidden the treasure, two Beastmen moved in to engage the archer that had dared challenge their warlord.
The advantages of numbers and a higher Combat value again overwhelm a Wood Elf.
Turn 6:
As soon as the turn started, the Beastmen leader activated well enough to leave my starting edge, gaining victory.
Victory!
AAR:
1.  You'll notice a lack of Wood Elf activity in my report.  The Fey Folk failed to force a fearsome fight from their frail followers.  Seriously, the Elf rolls for activation and combat were awful throughout.
2.  Two key factors in the math supporting Song of Blades and Heroes really undermined the Elves here.
-  First, the expense of statting up the Wood Elves as archers meant that troops inferior in combat (Combat value 3) were more expensive than the Beastmen (Combat value 4).  This is one way in which missile troops are disadvantaged in SoBH.
-  Beyond close ranges, missile troops are not very effective.  They suffer beyond 1 x Shooter Distance (Short, Medium, Long).  Even though these were Long Range Shooters, look at how the numbers play out.  With a distance beyond 1 Long Range measure (7" - 14" or so) the shooter suffers -2 to his Combat value.  So a C3 becomes C1.  And this is fired against a C4 target.  So if the Beastman target rolls a 1 and adds 4 to get 5, the best the archer can do is roll a 6, add 1 to get a 7.  This fails to get a double on the defender, and fails to get a kill.  Even if you take the trait Unerring Aim (the Elves were already too expensive relative to the Beastmen, so I didn't), which reduces the distance penalty to -1 instead of -2, the best you can do is 8 versus 5, which still fails to double and produce a kill (and noting that rolling a 6 vs 1 is a 1-in-36 chance in happening).  So it's impossible to kill beyond close range with an archer, even one with a relatively high Combat value, against a C4-level target.
3.  So, as much as I enjoy Song of Blades and Heroes, particularly for its "play what you brought" ethos, there is still a certain amount of Army List gamesmanship that can be had.  I'll never again field a force made up of archers because of the structural disadvantages outlined above.

I remain undeterred in wanting to play Song of Blades and Heroes, but will definitely be mindful of the necessity of fielding a more balanced force for both sides in the future.  More to follow.

Monday, January 18, 2016

Wargaming Goals for 2016

As you may have noticed, I've been busy and the blog went dark for the last half or so of 2015.  And I'm off to a late start this year, as evidenced by my New Year's resolution post going up on the 18th of January.  Regardless, here's what I'm hoping to accomplish in my wargaming hobby in 2016:

1.  Play and write up two games a month.
2.  Finish creating factions for Song of Blades and Heroes:
- Orcs
- Dwarves
- Human soldiers/knights
- Undead
- Barbarians
- A mixed race adventuring party
3.  Finish a d10-based skirmish system that works well (in my eyes, at least) for modern combat.  If it accommodates fantasy/medieval combat as well, that would be icing on the cake.
4.  Finish painting my 20mm modern minis.
5.  Run a Power Legion campaign using the Avengers.
5.  Build, patiently and on the cheap, some Warhammer 40k factions.  Whether I will eventually use the 40k rules or go with Tomorrow's War is up for debate.

We will see how work, kids, and real life intrude on my hobby this year.

Saturday, October 10, 2015

Avengers Versus The Wrecking Crew

The Avengers:  Wrecking Crew Breakout!

Welcome back, true believers!  This Power Legion battle report comes to you from a sunny day in downtown New York, as Earth's mightiest heroes are about to face off with those perennial miscreants, the Wrecking Crew.  The Wrecker was recently taken into police custody after a recent defeat at the hands of the NYPD's anti-supervillain squad, Code Blue.  The Wrecker was placed into power dampening restraints and put into a police SUV with two officers for transfer to the superpowered confinement section at Ryker's Island.  Due to an administrative error, no additional security was provided, and the rest of the Wrecking Crew intercepts the NYPD vehicle next to a city park, intent on breaking their leader out of custody.

Thunderball steps into traffic and winds up his wrecking ball.  Officer O'Malley wheeled the SUV off the road in an attempt to avoid the ambush, but crashed the vehicle into a tree.  He and Detective Riley stepped out of the vehicle, guns drawn, ready to make a valiant stand to keep The Wrecker in custody.  Just as the Wrecking Crew closes in, three Avengers - Captain America, Iron Man, and Hawkeye - rush to the scene and confront the villains.  The Wrecking Crew need only two actions to free The Wrecker - one to pull open the SUV, another to break his restraints and hand him his enchanted crowbar.

But first, the tale of the tape:
Avengers:  2,687 points
Image result for ultimate captain america

Captain America (956 Points)
MASK
d6d10d10d10
Knockout d10+3Activation d12
Shield d12 (Device), Armor d6, Marksman d12 (Throwing Shield), Leadership d10, Tactics d12, Ranged Damage d8 (Device: Thrown Shield), Strong Will d10, Weapon Master d12 (Fighting with Shield), Acrobat
Image result for iron man

Iron Man V (882 Points)
M
A
S
K
d10
d8
d10
d12
Damage Resistance
d12+4
Activation
d10
Armor d8, Flight d12, Ranged Damage d10, Flare d10, Combat Computer , Immune to Flare , Sealed Armor , Boost , Night Vision
Image result for hawkeye

Hawkeye (849 Points)
M
A
S
K
d4
d8
d6
d8
Knockout
d8
Activation
d8
Ranged Damage d8 (Device), Sonic Attack d6 (Device), Swinglines d8 (Device), Entangle d10 (Device), Blast d10 (Device), Marksman d12, Acrobat , Fire into Melee , Smokescreen (Limited), 
Wrecking Crew:  1,294 points (1,732 if Wrecker is freed)

Image result for thunderball marvel
Thunderball (494 Points)
M
A
S
K
d8
d8
d10
d8
Damage Resistance
d8+3
Activation
d8
Weapon Master d10, Lethal HTH Attack d10, Armor d6


Image result for piledriver marvel
Piledriver (374 Points)
M
A
S
K
d4
d6
d10
d8
Damage Resistance
d8+3
Activation
d6
Armor d6, Martial Arts d10
Image result for bulldozer marvel
Bulldozer (426 Points)
M
A
S
K
d4
d6
d10
d10
Damage Resistance
d10+3
Activation
d6
Armor d6, Martial Arts d8, Flying Kick

In police custody:
Image result for wrecker marvel

Wrecker (438 Points)
M
A
S
K
d4
d8
d10
d8
Damage Resistance
d8+3
Activation
d8
Martial Arts d10, Armor d6, Leadership d4

And now, off to battle!
State of the board at the beginning of the game.  Extraneous toy soldiers, tanks, planes, and cars courtesy of my 5-year old.
Turn 1:
Captain America's leadership gave the Avengers the initiative.  Hawkeye used a grappling arrow to mount the nearest building and fired an explosive arrow at Bulldozer.
Hawkeye gains a vantage point over the battlefield.
The Avenger just missed knocking out Bulldozer, but still received a knockdown result.
A bird's eye view of the battlefield from Hawkeye's perch.
Captain America rolled into action, advancing toward the fight and throwing his shield at Thunderball.  High rolls for the First Avenger produced a major damage result and, on account of Thunderball's poor save roll, a knockout!
Captain America leads the way, throwing his shield into Thunderball's back and getting a knockout in the first turn!
Iron Man flew into the developing melee, flaring and landing in between Piledriver and the soon-to-be smashed Detective Riley.
Iron Man flares for landing between Detective Riley and Piledriver.
The Avenger fired two blasts at Piledriver - one missed, the other pushed Piledriver back.
Iron Man saves Detective Riley from certain doom with a well-placed repulsor blast.
The remaining Wrecking Crew members activated.  Bulldozer rolled a full three actions, peeling himself off of the ground and charging to the police SUV and peeling the door off, all the while ignoring the police gunfire from Officer O'Malley and Detective Riley that danced on his skin and steel helmet.  The Wrecking Crew only needed one more action to free their leader.  Piledriver only managed one action, moving back into contact with Iron Man.
The state of the battle at the end of Turn 1.  The Wrecking Crew have almost freed their leader.
Turn 2:
Hawkeye fired at Bulldozer again, this time with entangling arrow heads to keep Bulldozer from freeing the Wrecker.  It was not meant to be.  One hit but failed to entangle, one missed, and on the third try (rolling a 1) Hawkeye ran out of entangling arrowheads and had to dig in a pouch if he wanted to assemble another such device.

Captain America spent his two actions running toward Bulldozer, ending his turn as he vaulted over the hood of the police SUV in an attempt to peel Bulldozer off of the vehicle before the Wrecker could be freed.

Iron Man spent the turn in an unsuccessful melee with Piledriver.

As the Wrecking Crew started its turn, Piledriver finally found some success in melee, managing to knock Iron Man to the ground.  Bulldozer rolled a turnover, handing initiative to the Avengers just as it seemed he was about to free the Wrecker.
The battle at the end of Turn 2.  Piledriver has knocked Iron Man to the ground, and Bulldozer narrowly misses freeing the Wrecker from the inside of the vehicle.
Turn 3:
Iron Man hoped to shoot his way out his predicament, lying on the ground at Piledriver's feet.  Unfortunately, he rolled a 1 and missed with his repulsor blast.  Captain America took his two actions to throw a Power Blow at Bulldozer from the hood of the wrecked SUV, but failed to do any damage.  With these two failures to stop the Wrecking Crew members, either Bulldozer or Piledriver could spend an action to free The Wrecker.  Luckily, Hawkeye entangled both of them with specialized arrowheads.  Bulldozer burned his two actions to get out of Hawkeye's entangling arrow, while Piledriver did the same.  Neither had a chance to do anything else.

Turn 4:
Iron Man peeled himself off of the ground and shot Piledriver with a repulsor blast, which Piledriver shrugged off.  Captain America hit Bulldozer and knocked him back, then followed up and hit Bulldozer again.  Hawkeye fired three entangling arrows at Bulldozer, wrapping the villain up again.

Piledriver delivered a punishing blow to Iron Man, denting the Avenger's armor and knocking him out Piledriver's path to the police SUV.  Bulldozer spent his actions freeing himself from the cords of Hawkeye's entangling arrow.

Turn 5:
Iron Man fired his repulsors again at Piledriver, staggering the villain.  Captain America hit Bulldozer again, but the villain's armored helmet soaked up the force of the Avenger's blow.  Hawkeye lent Iron Man some support by firing another entangling arrow and wrapping up Piledriver.

Bulldozer said, "this game is getting old!" as he launched himself with his trademark charging headbutt.  The blow sent Captain America flying over the hood of the wrecked police SUV, leaving the Avenger limping.  Bulldozer again moved over to the side of the police vehicle, ready to free The Wrecker.  Piledriver freed himself from the steel cords of Hawkeye's latest entangling arrow and moved next to the gaping hole in the side of the police SUV, able to see The Wrecker inside.  With one free action, either of them could free their leader in the next round.  Both Detective Riley and Officer O'Malley drew back from the advancing villains.
Both Bulldozer and Piledriver have knocked their opponents away and advanced to the side of the SUV holding The Wrecker.  Can they free their leader before the Avengers regroup?
Turn 6:
Hawkeye took the lead this turn, firing yet another entangling arrow and wrapping up Piledriver.  As the villain fell to the ground in a heap, Iron Man spent two actions in a Power Blow, using his boot jets to leap temporarily into the air, then using the force of his thrusters to spear down like a dive bomber, planting a crushing blow against Piledriver and knocking the villain out.
Iron Man flares his boot jets for a moment before he delivers a knockout blow to Piledriver.
Seeing that Bulldozer was a moment away from freeing The Wrecker, Captain America launched himself like a missile over the hood of the wrecked police SUV, arms outstretched with his shield in front of him.  He speared Bulldozer in the midsection, doubling the beast over as they tumbled into a ball and skidded across the park's surface, shearing off the grass and digging a shallow trench as they slowed to a halt.

Bulldozer lay there for a second, looked to his left and saw Iron Man striding out of the crater where Piledriver lay unconscious, the weight of Captain America's shield still pressing down on his torso.  It was over - the Avengers had beaten them again.
Iron Man drives Piledriver into the ground as Captain America leaps over the hood of the SUV to spear Bulldozer with his shield.  The Avengers have triumphed again.
"I give up," he croaked.  Seeing The Wrecker's eyes staring balefully at him from inside the SUV, Bulldozer closed his eyes and let his head drop to the earth, waiting for his own journey back to the superpowered confinement wing of Ryker's Island to begin.

Post-Game Thoughts:
1.  Gameplay.
- The scenario started the Wrecking Crew off at a disadvantage in points and they never dug themselves out of that hole.  The activation advantage that the Avengers had proved decisive; the Wrecking Crew had plenty of chances to roll just one more action in a turn and free The Wrecker, but just couldn't pull it off.
- The scenario also drove a static slugfest, as the Wrecking Crew was just trying to reach their leader in the SUV.  Had this been a more open scenario, I would have like to have seen some trees uprooted and cars tossed around with the Wrecking Crew's super-strength.
- Hawkeye gets the nod as the MVP of the game.  His entangling arrows (of which he seemed to have an infinite supply) proved to be just the delaying capability that the Avengers needed to keep the number of villains to a minimum.

2.  Play Aids.
- The one thing this game needs is a minor and major damage table sheet that adds the spice that belongs in a superhero skirmish game.  I've been using one from the Ganesha Games Yahoo! group, but there's just something missing from scoring a Power Blow.
- I reiterate the importance of printing your hero stats and the effect of each of their powers in a game-friendly format.  There are too many special rules not to.

3.  Scenery.
- This game was only possible because of the excellent service I experienced with TrollandToad.com, which I detailed in this post.
- I used Fat Dragon Games' excellent modern city set for the urban terrain.  Possibly the prettiest game I've ever put on.  Will provide a write-up and review later.
- I really need to rebase my HeroClix minis.  The obnoxious and huge bases they come with are just too much.

Until next time, true believers, excelsior!