I had the
opportunity several months ago to meet J. Reid Denton, the man behind Covert
Intervention Games' forthcoming DEFCON ZERO. It's a modern
combat game that hopes to offer fast-playing yet realistic gameplay. I
met up with Reid at The
Games Tavern in Chantilly, Virginia not far from Washington
DC.
- DEFCON ZERO handles grenades uniquely. As I wrote separately in this other post, I've been experimenting with my own homebrew rules and the grenades are different there than in other systems. In Savage Worlds or any other number of systems, grenades have a blast radius. In Force on Force, an under-barrel grenade launcher adds an additional die of firepower to the fire team. I've always thought that this underplayed their effectiveness. DEFCON ZERO provides a special template which covers blasts, back blasts, measurements, and more which Reid designed. I don't have a picture of the template, but it's clear that Reid has put some thought into how grenades are and aren't effective on the battlefield. (Hint: You don’t want to be in the lethal radius and ensuring you keep your 10 meter distance between troops is absolutely critical to not get fragged!)
In the
spirit of disclosure, I've previously corresponded with Reid via email and have
volunteered to be a Beta tester for DEFCON ZERO. Both Reid and I are
military veterans of deployments to the middle east with the U.S. Army, and I
agreed with much of the game design philosophy that he laid out in this podcast (also available here). So I've been excited for a while about this game.
I'm
posting two write-ups below, but here's the Bottom Line Up Front (BLUF) for a
first look at DEFCON ZERO:
- The
game uses a unique mission cards system for each player which provides victory conditions
based on mission type. There are four groups of missions - Offense, Defense, Enabling
and Stability with several missions within each group. Cards from within
each of these categories provide varying missions, so a Defense card could task
your force with delaying enemy forces or blocking their progress
entirely. Your opponent doesn't get to see your card, so they don't know
what victory conditions you have and vice versa. So you may be giving
your opponent victory points without knowing it, and vice versa. In the
missions played below, the victory conditions influenced the way we played.
- The
general flow runs on an action-reaction scheme that allows competing units to
attempt an “interrupt reaction” against the force with iniative in a roll-off
based on Capability Rating. Capability Ratings provide a die type to
roll, from d6 to d12.
- The
weapon ranges are scaled in cm for effective ranges. Weapon ranges are
what they are in real life in meters (it's a military thing), scaled to the models,
with a centimeter on the board per meter in the world. Your minis'
movement will be measured, accordingly, in centimeters instead of inches.
It's a small nod to realism, and in a world where maximum ranges for rifles end
at the scale equivalent of 50 meters or so in many less realistic games, I
appreciated it.
- Options
for combat optic-equipped shooters which create a bonus to shooting that
amounts to a +1 on their rolls, effectively allowing a 3+ to have a chance of
success against the opponents Combat Rating. I've struggled with how to
incorporate the benefits of optics into my homebrew rules or in-house rules for
other games, and this is a good way to do it that I hadn't thought of.
- The
casualty mechanism creates urgency all its own. Regulars take a d12 roll
(place the die next to the downed mini) to count down one digit each turn to dying, while
irregulars die off or disappear pretty easily. This plays well with the
realities of modern combat and how many casualties first-world nations are
willing to accept. An insurgent force offensive raid mission against a civil
affairs unit on a stability mission can quickly change character entirely into
a mad scramble to prevent Coalition fatalities.
- DEFCON ZERO handles grenades uniquely. As I wrote separately in this other post, I've been experimenting with my own homebrew rules and the grenades are different there than in other systems. In Savage Worlds or any other number of systems, grenades have a blast radius. In Force on Force, an under-barrel grenade launcher adds an additional die of firepower to the fire team. I've always thought that this underplayed their effectiveness. DEFCON ZERO provides a special template which covers blasts, back blasts, measurements, and more which Reid designed. I don't have a picture of the template, but it's clear that Reid has put some thought into how grenades are and aren't effective on the battlefield. (Hint: You don’t want to be in the lethal radius and ensuring you keep your 10 meter distance between troops is absolutely critical to not get fragged!)
Test Play 1: We secured a table and set up a rural desert scene where a U.S. Army infantry squad is guarding a compound at a key road/railroad intersection that insurgents assault. My mission card provided traditional defensive incentives - points for enemy casualties and keeping enemies from advancing to my end of the board.
 |
| Here's the compound where the Americans are in the defense. |
 |
| Here's a close-up of the compound, showing the U.S. troops on alert on the roofs of the compound and behind sandbags. |
 |
| Here's the approaching insurgent fighters, with most of them shielded by a hill that's the last covered and concealed position before being exposed to the American troops. |
Here are some aerial shots taken with Reid’s phone in a proprietary application that mimics the appearance of a drone feed. Reid’s day job involves combat simulations for the Department of Defense. Did I mention that this game is built upon serious simulation of battlefield conditions?
 |
| "Cobra 31, we have UAV visual on your location." |
 |
| "Cobra 31, looks like you've got company over the hill. We're tasking the UAV to get a better look." |
 |
| "Yup, two squads of fighting-age males with small arms approaching." |
 |
| "Looks more like three squads. Stay frosty - it's coming your way." |
 |
"Thanks for the heads-up!"
As the insurgents crest the hill and move to assault the compound where the Americans are quartered, they lose initiative to the Americans are exposed to an overwhelming amount of firepower and are dropped to a man.
|
 |
| After a recovery/first aid roll, a couple of the insurgents recover. |
 |
| Another group of insurgents crests a different hill, and lose another initiative contest. They pay the price. |
 |
| A third group of insurgents move to engage the American troops, and take significant casualties. Half of the squad fall, but enough remain standing to return fire against the U.S. outpost. |
 |
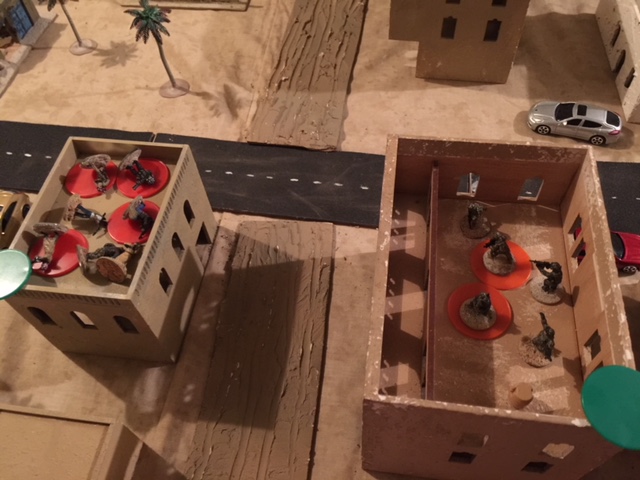
| The insurgent return fire knocks out two U.S. troops. I recommend clicking on this photo - it shows two 12-sided dice for the casualties, which are the turns remaining until the casualties are out-of-action/dead. |
We ran out of time to run this game to completion, but it gave me an opportunity to see how the mechanics work.
Test Play 2: I went back the next day and we were able to run a more complete game. I was playing the Americans again, but this time against regulars from a middle eastern nation that had vehicular support.
In this instance, I had victory objectives associated with screening - merely reporting advancing enemy unit locations to my higher headquarters earned victory points. As the report below shows, a fair amount of my marking of enemy positions ended up happening with tracer rounds, not radio reports.
We had to wrap up the game at this point, but I played enough to have a feel for the game.
Exit thoughts: DEFCON ZERO provides a relatively streamlined version of modern combat that's built on the bones of a realistic simulation. This realistic simulation, however, is accomplished without the minutiae of a role-playing game level of detail. The mission cards, and the fact that you don't know exactly what your enemy's goals are, provide an additional touch of realism and a fog of war element that I enjoyed. There's some on-board marker maintenance, such as turning d12 casualty markers down one number at the end of each turn, but no paper tracking of the game beyond victory points. I enjoyed the play-tests and look forward to seeing the finished product.
In this instance, I had victory objectives associated with screening - merely reporting advancing enemy unit locations to my higher headquarters earned victory points. As the report below shows, a fair amount of my marking of enemy positions ended up happening with tracer rounds, not radio reports.
 |
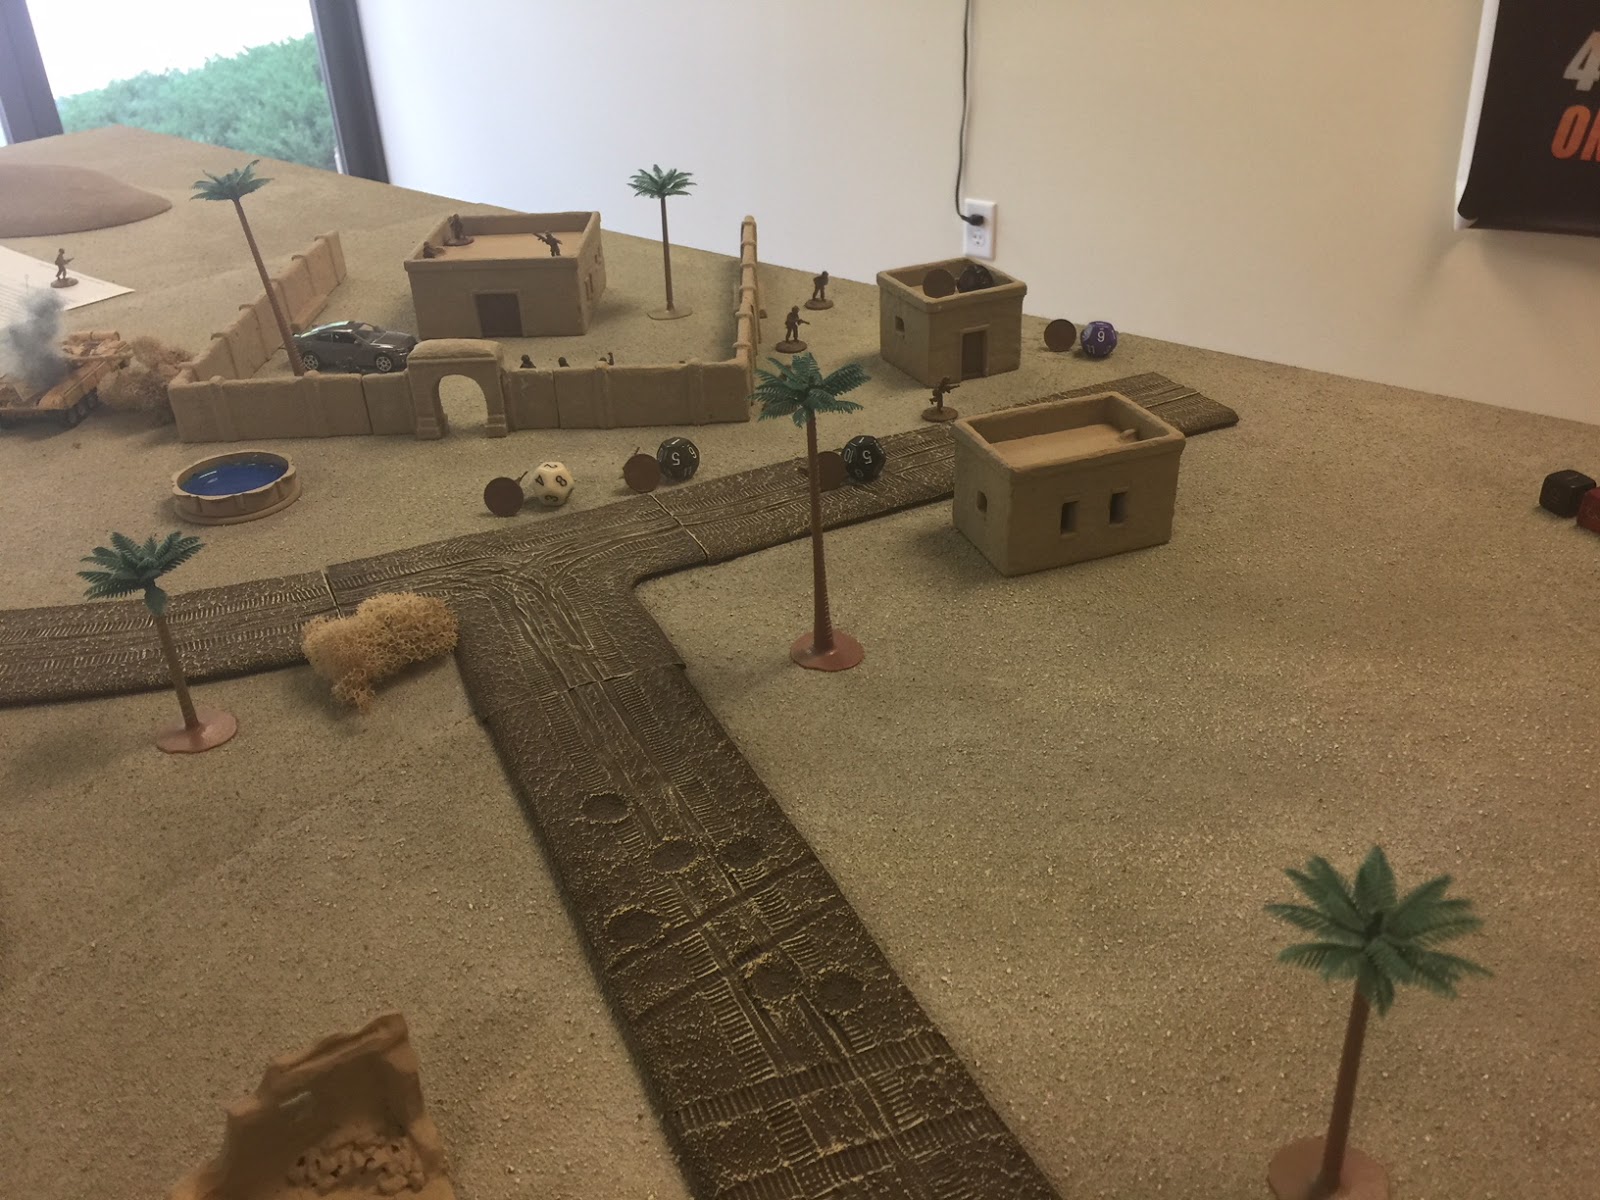
| Here's the battlefield from my viewpoint. I've arrayed a couple of squads in buildings anticipating an enemy advance, with a Gustav recoilless rifle and a machine gun team for extra support. I've got an M113 in the rear for CASEVAC/Casualty Collection Point. |
 |
| View from my lead squad leader's position on a rooftop in the center of the board and overlooking a key road/railroad intersection. |
 |
| View from my machine gun team's position on a rooftop on my right flank. |
 |
| I picked up victory points for reporting the advance of this technical and T-72 tank. I failed an initiative roll when the technical crew spotted my guys, but the DShKa gunner missed when he opened fire. |
 |
| Enemies advancing across the board. |
 |
| The lead enemy squad crested this hill, but one of my squads won initiative and shot it up. The casualty count-down markers are next to the downed soldiers. |
 |
| The enemy technicals also crested the ridge and paid the price - one was immobilized, the crew on the other wiped out and marked with the red smoke you see above. |
 |
| My center squad falls off overwatch. |
 |
| The enemy tank scored a hit on my machine gun crew, necessitating first aid for the downed soldiers marked with d12s here. |
 |
| My Gustav crew pops up and fires at the enemy T-72, scoring a hit and immobilizing it. |
 |
| I advanced a squad leader and fire team up the left side of the board using cover and concealment. |
 |
| State of my side of the board after several turns. I had racked up a few more victory points for reporting enemy advances at this point. |
 |
| View from my M113 as it prepares to advance and provide some .50 caliber support. |
 |
| The enemy infantry squad is still lying out in the open bleeding out, and the squad leader tries to run away. My guys shot him down before he could get far. |
 |
| More casualties for enemy infantry at this compound on their left flank. They've got a mortar team in the compound - on-board artillery that could make a big impact in this fight - but they haven't gotten their act together to successfully employ it. |
 |
| The fire team I moved up the left side of the board gets inside of a building. |
 |
| More U.S. troops advance, this time up the center of the board and across the road-railroad intersection. |
 |
| The enemy mortar finally gets into the game and lands fire on my squad in the center. |
Exit thoughts: DEFCON ZERO provides a relatively streamlined version of modern combat that's built on the bones of a realistic simulation. This realistic simulation, however, is accomplished without the minutiae of a role-playing game level of detail. The mission cards, and the fact that you don't know exactly what your enemy's goals are, provide an additional touch of realism and a fog of war element that I enjoyed. There's some on-board marker maintenance, such as turning d12 casualty markers down one number at the end of each turn, but no paper tracking of the game beyond victory points. I enjoyed the play-tests and look forward to seeing the finished product.