Monday, May 15, 2017

Frostgrave, Second Game

Got a chance to get in another game of Frostgrave at my friendly neighborhood gaming shop, the Augusta Book Exchange.  I can't recommend the store enough.  If you're in the Augusta, Georgia area, you should stop in - the gaming community is strong and something is going on most every night of the week.


Anyway, my Elementalist from last game is back, squaring off against a different opponent.
View from behind my advance - Wizard and nearby henchmen on right, Apprentice the henchmen he was leading are just out of picture at bottom right.

I advanced and immediately got off a couple of Elemental Bolts that killed opposing henchmen.  Then, getting overconfident, I put my Apprentice up on some high ground and he was promptly shot down by an opposing Archer.

The game progressed in my favor generally, with my trusty men-at-arms advancing strongly on my left flank.

View from the opposing Apprentice's vantage point, with her archer (right) standing between her and three of my men-at-arms.  My men had just dispatched two opposing henchmen.

My men-at-arms continued to advance while my Wizard fired off Elemental Bolts.

One of my henchmen attacks the enemy archer at left while two more attack another on the right.

My lead man-at-arms, Erik the Beserker, locks the enemy Wizard in hand-to-hand combat.

Dain Deepaxe, another of my men-at-arms, has dispatched the enemy archer and closed the distance with the opposing Apprentice.
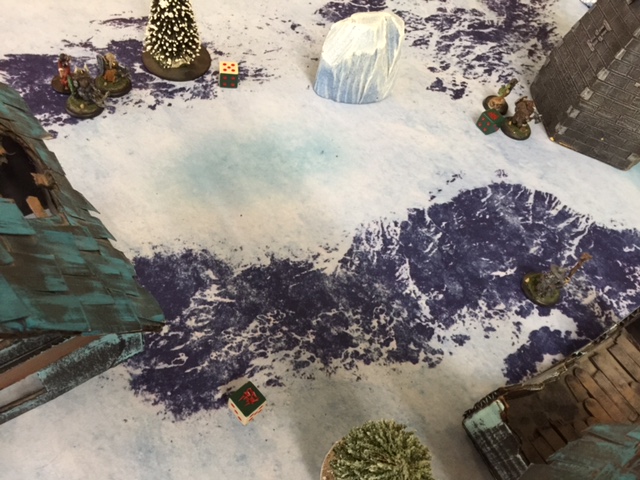
Top view of the action.  My Wizard, at right, directs the action while Erik attacks the enemy Wizard at top right, and Dain and Freya, two of my other henchpersons, attack the enemy Apprentice at top right.

Victory!  My henchmen slay the opposing Wizard and Apprentice.

I'm pleased with the Frostgrave gameplay.  It's fun, balanced, and plays quickly.

Stay tuned - next post will chronicle the start of the local Frostgrave campaign!

Tuesday, May 9, 2017

Kill Team, Blood Angels vs. Tau

Got introduced to Kill Team at my friendly local gaming store, and found that I really enjoyed it.  Played one intro game with 10 Blood Angels - 5 Tactical, 5 Death Company with jump packs.  I played against some Grey Knights that were dual wielding force swords, and figured my goose was pretty cooked, but the dice went my way, and I prevailed.


As these, things tend to go, GW promptly killed the game.  Then they brought back the Necromunda rules, which they shouldn't have killed in the first place, to replace it.


Regardless, I was struck with how well the 7th Edition 40k rules work for a skirmish game (which 40k isn't).


Anyway, I played a game with my eldest boy, who reveled in the chance to take the Tau to task with his/my Blood Angels (again).


We squared off with the same Blood Angels team against a group of Tau Fire Warriors and some marker light drones:
Blood Angels at far end of the field, Tau near, hoping to capture the three objectives marked with red poker chips.


I didn't catch much of the battle in progress, but as you can see, the Tactical Blood Angels took some losses, while the Death Company managed to close the distance and wipe out the Tau.


Two Brothers of the Death Company celebrate with a post-battle high-five on the (former) Tau high ground.


I really don't feel like jumping on the Necromunda reboot bandwagon right now, and will definitely break out these rules in the future.  Should've expected that GW would pull the rug out from under me, I suppose...

Sunday, May 7, 2017

Frostgrave has Arrived!

I've been watching the game Frostgrave from afar for some time, and wanted to get into it myself.  It's been a good baptism by fire.  With the help of my gracious friend Robert, I played my first game...
View from my side of the table, as my wizard advances on left, and apprentice and associated minions prepare to advance on right.
Catastrophe!  My wizard gets smacked with a critical hit (roll 20 on a d20) and drops like a stone!
It's a scrum!  My (unfortunately partially unpainted) forces wrap around the center terrain and square off with the enemy...
Both my opponents' wizard and apprentice fall to my minions!
Only my minions are left, so the field is mine!


So this turned out to be a dramatic shift in the gameplay - I thought I was getting tabled, but it all flipped somewhere in the middle and I ended up holding the board

More Frostgrave to follow....

Two More Quick 40k Games

Wrapped up a couple more small-ish 40k games, in the same vein as the games played in this post.


Game 1:
An Ork horde squares off with the Tau.  The Ork plan is to advance into melee combat, the Tau plan is to stop the Orks from closing the distance and shoot them all stone dead.  Very straightforward.
The forces at game's start.  The goofy kid's tractor toy in the background is substituting for a Trukk. 
The Ork right flank advances, and that Trukk doesn't look at all silly.

Another view of the Ork right flank, showing the Stormboyz moving to the cover of the industrial silos at center.
The Boyz have departed from the Trukk, the Stormboyz are advancing, it all seems to be going according to plan...
Unfortunately for the Orks, the overwatch fire from the Tau proved absolutely murderous, and the Stormboyz, when they finally reached the Tau lines, were far fewer than when they started.  And, as it turns out, the Tau Crisis Suits aren't as squishy as Fire Warriors in melee combat.  Wish I'd taken more pictures.


Oh, and this wouldn't be a battle report if I couldn't say that the Ork Weirdboy failed spectacularly.  He - again - attempted to teleport and rolled a critical failure, disappearing into the Warp with a significant portion of the Boyz.


Game 2:
Back to another Blood Angel-Ork fight, this time in a desert environment.
The Ork horde advances again toward Blood Angel lines, with the Stormboyz using a walled compound to cover their movement.
It wouldn't be a battle report with the customary news that the Ork Weirdboy failed.  Based on his failure in our last battle reports, he only had a few Burnaboyz to teleport with.  Of course, he failed, dramatically, disappearing again into the Warp with his crew.
The Weirdboyz's failure was just the beginning.  Above you see the end result of the battle, with the Blood Angels' combined arms laying waste to the Orks.  Some dramatic morale roll failures by the Orks accelerated the process.
That's all for now... coming soon, some Frostgrave.

Two Quick 40k Games

Here's two short 40k battle reports:


Game 1:
A Christmas (yes, a bit of delayed reporting here) game between me and my brother with our sons joining in.  Due to a lack of proper terrain, we set things up on the family dinner table after eating and used platters and canned vegies for... vegetation.  Other canned goods provided some other things to block the line of sight.


My Blood Angels formed a battle line and faced off against my newly purchased Orks. 
The Ork horde advances toward the Blood Angels, hoping to get within charge range. 
The Orks' Weirdboy tried to get his mojo going, but rolled serial failures and proved entirely worthless.  Note this - it will prove a constant in our games.

The Blood Angels' Furioso Dreadnought has taken the center of the field, breaking the Orks' center and putting and end to the contest.


We both forgot to bring dice, but I'm happy to report that the Games Workshop dice rolling app works great.  Fun was had by all.


Game 2:
The second game comes from a trip to our friendly local wargaming store.  Almost all of the table space was taken up, so we grabbed one long, thin table and set up another quick game.  My boys played the Blood Angels, and I played the Orks.  The point value for this game was slightly higher than the last, with the Blood Angels fielding Mephiston and the Orks some additional Boyz.


The Ork horde starts awfully close to Blood Angel lines this time...

The Ork Weirdboy tried to teleport behind the Space Marine lines with a large complement of Boyz to whip some Blood Angels.  He again rolled up a critical failure and he and half of the total Boyz head count frittered off into the Warp.


The Furioso Dreadnought again gets into the mix with the Ork main body.  This bodes ill for the greenskins...

Mephiston joins the Dreadnought and contributes to wrecking the Orks in detail.  The Deffkoptas that swept behind Blood Angel lines (back of the photo) didn't do much to dent the Marines' effectiveness.

This game proved another Blood Angel victory.  Stay tuned for future game reports - we'll get some Tau back in the mix.


Tuesday, May 2, 2017

Big Contracting Trouble II

This won't be as thorough a write-up as the last time I ran Big Contracting Trouble, but it was an enjoyable game.  Just for review, the ubiquitous Force on Force scenario is very evenly balanced and has been played and written up by a number of folks:  DonoghDonogh reduxvon LuckyDan, and Dave.  This time I was introducing Darren, a friend from the local gaming group, to the Force on Force system.


Scenario:
An SUV carrying two civilian contractors was hit by
gunfire as it moved through a neighborhood in one of the city’s red zones. UAV footage indicates that the contractors are injured but alive. The contractors have held the small group of Insurgent gunmen who attacked their vehicle at bay for nearly a quarter of an hour, but more armed men have been spotted converging on the disabled SUV.

A force of US soldiers are en route to save the contractors.  US troops are Troop Quality d8, Morale d10.  Iraqi insurgents are TQ d6, Morale d10.  


General layout of the table, from the American entry point, with a few US forces yet to be fielded.

Tragedy!  An entire US fire team goes down in Turn 1 - you can see them laying on their sides at center frame.  A line of enemy sixes laid them low.

At this point, the US forces had almost no chance of getting to the contractors.  Because of this immediate catastrophe, and not wanting to let Darren (new to the game) suffer through a several turns of nothing but CASEVAC, I reinforced them with an ambulance to facilitate evacuation and another fire team.

Here's the two contractors next to their SUV, which were d10 Troop Quality to show the new player how the differing stats interact.  As it turned out, they held off two squad-sized elements of insurgents with repeated instances of getting the first shot off, inflicting casualties, and prompting morale checks that the insurgents failed.

Insurgent cell hanging out at a Hot Spot (spawn point) at the dump.  They exchanged fire with an American unit and came out worse for wear.

Reverse shot.  The US unit was all the way at the other end of the table.

The CASEVAC arrives, and a (combat-effective) US fire team has moved into the compound on the right.


Shot from the aforementioned dump Hot Spot, where more insurgents have spawned and are exchanging fire with a HMMWV that has taken damage to its engine and weapons.

Unfortunately, that's all the pictures I have.  What isn't shown is that the US forces pushed into the center of the table, neutralized a Hot Spot, and reached the stranded contractors, who stood their ground the entire game.  Just as it looked like the US forces were about to engineer a successful extraction, however, another US fire team was caught in an alley and gunned down by insurgents on a nearby rooftop.

It just wasn't meant to be the Americans' game, I suppose, but Darren had a good time regardless.


Monday, April 17, 2017

Warhammer 40k: Death Company vs Tau 1000-ish Points

In line with my last two posts (one and two), this covers a game of 40k between me and my oldest boy.  He loves the Blood Angels, and I love a well-painted mini, particularly some Death Company with jump packs.  So what follows is a few highlights from a game where we each had 1000 points or so.  He had Astorath as his warlord and a Death Company squad of 11 as a death star unit (which it is, at 1000 points), and I had Tau and some Kroot. 
The two forces lined up, Blood Angels on left and Tau on right.  Blood Angels took the initiative.
The land speeders advanced and drew a ridiculous amount of fire, but proved improbably lucky at managing not to get blown up.  Terrible Tau dice in this opening turn.
The Death Company runs in order to close the distance.  One land speeder is down.  Its crew dismounted, but I think this was a mistake - I think they were supposed to go down with the ship, so to speak.
Tau prove much more effective on the other flank, whittling away at tactical marines that wander into range.
 The Death Company take a couple of casualties from overwatch fire as they assault, but it doesn't really matter.  The Kroot get munched pretty easily.
The placement of the Death Company, in easy line of fire of Tau Fire Warriors, helps whittle them down a bit.
Tau on the right flank fall prey to some deadly Devastator Squad fire.
Some Kroot think it's a good idea to assault the tail end of the Death Company unit...
...and they suffer casualties and rethink this course of action.
And Astorath and his Death Company faithful close the distance to the Tau Fire Warrior line, delivering a crushing blow.  At this point, we called the game.  There was no Tau victory on the horizon.


Two lessons learned:
1.  The Kroot pushed me from 800 or so points to nearly 1000, and I need some more proper Tau troops to make this list competitive.
2.  The Kroot might have been effective as a speed bump of sorts, pushing them into the path of the Death Company so that they spent more time under the guns of the Tau line.  Something to think about for future games...