Thursday, March 31, 2016

Elves & Dwarves vs. Orcs & Goblins, Battle for the EverFrost

For the first battle of the Campaign for the Darkened Wood, a series of battles played with the Savage Worlds Showdown rules, a force of Orcs and Goblins will face off with a coalition of Wood Elves and Dwarves that seek to prevent the Orc Shaman from harnessing the dark energies of a place rich in magical power.

Deep in the heart of the Darkened Wood, there lies a mystical place touched by unknown and mysterious magics.  This place, the EverFrost, features three pillars of blue, frozen stone that stays frigid in spite of its placement in a lush and green forest.  A force of Orcs and Goblins, led by Chieftain Urg and Shaman Grimnobb, ventured to the EverFrost on the eve of the Summer Solstice, when the contrast between the summer heat and the cold of the EverFrost pillars will heighten the power that Grimnobb can direct into a devious spell.  Sensing a disturbance in the magical realm based on Grimnobb's dark designs, Dwarf mage Forgoth Greybeard and warrior Erik the Berserker lead a Dwarf warband that unites with a similarly-motivated band of Wood Elves, led by Chieftain Eofar and Swordmaster Turwyn, hoping to keep dark magics out of this world.

The goal of each warband is to have their mage standing on the EverFrost on the last turn of the game.  Now, on to the tale of the tape:

The Elf-Dwarf coalition.  Elves on the left, led by Chieftain Eofar and Swordmaster Turwyn.  Dwarves on the right, led by mage Forgoth Greybeard and warrior Erik the Berserker.
Orc and Goblin warband.  Chieftain Urg (still a work in progress paint job) and Shaman Grimnobb in the center.
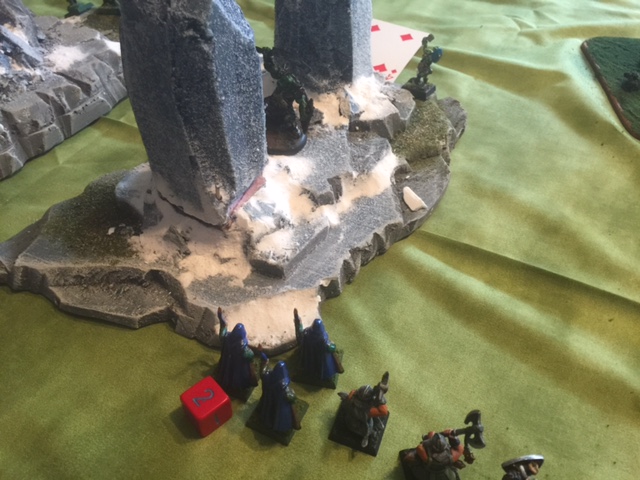
Positions of the warbands at the game's outset.
Turn 1:
Orc and Goblin forces drew, on average, higher initiative and raced for the EverFrost pillars and into nearby woods to provide cover from notoriously accurate Elven arrows.

The fear of arrow fire was not irrational; Elven archers advanced and fired a long-range volley at the Goblins on the Green Horde left, connecting with one arrow.  The Goblins spent a benny to soak this damage and keep the unit moving at the same pace.  Another volley, this one aimed at Orcs, sent two arrows bouncing off of Orc shields.
Position of the forces at the end of Turn 1.  The two minis out in front of the Elven line are their Chieftain and Swordmaster.
Turn 2:
The Green Horde largely led the way with initiative again.  The Dwarven Mage fired a bolt of magic that hit an Orc but failed to wound.

The Orc shaman and his retinue moved forward to mount the rocks at the edge of the EverFrost, and the archer accompanying the mage fired an arrow at an opposite Dwarf that fell harmlessly to the earth.

The Elves and Dwarves continued to advance toward the EverFrost, with a number of arrows fired and failing to connect.  The Elven Chieftain and Swordmaster were able to mount the rocks around the EverFrost.
View from the Elven left flank as their Chieftain and Swordmaster mount the rocks around the EverFrost.
Turn 3:
In the Green Horde initiative draws, two Jokers came up.  On the resulting roll for associated random events, the Orc player designated a unit of Elven archers to suffer a -2 on all rolls this round.  This would prove fortuitous.

The Elven Chieftain, the best archer on the field, moved to a position of advantage on the EverFrost rocks and fired an arrow into the Orc shaman, causing two wounds to the mage.  He would recover one of them with a benny-driven Soak roll.  This critical shot threatened the Orcs' chances for victory - with no mage standing on the EverFrost rocks at games' end, they would lose those victory points.

Both sides continued to move toward each other.  The Orc chieftain moved to a place of partial cover between EverFrost pillars, and the temporarily hindered Elven archer unit took some shots at him.  The -2 modifier meant the difference between him hits and misses.
The -2 modifier applied this turn to this Elven archer unit saved the Orc chieftain from being wounded.
The Goblins on the Green Horde left moved all the way around a patch of woods to try to envelope the Elf/Dwarf right flank.

The Orc Shaman moved forward and cast a Blast spell with great success in spite of his lingering wound.  He inflicted one wound on the Elven chieftain, and two on the Swordmaster.  They both spent bennies to Soak wounds.
Blast marker of the Orc shaman's spell completely covered the Elven chieftain and swordmaster.
Turn 4:
Positions at the start of Turn 4.  Flanking Goblins on either side of the Dwarf/Elf line, seeking to find a maneuver advantage.
The Orc left charged into combat with the Dwarven hero Erik the Berserker and two of his brethren.
The Orc and Dwarf lines meet alongside the EverFrost.
The three Orcs managed to roll three 1s for their attacks.  An Orc charge against the lead Elven archer similarly failed.
The Orcs come up snake eyes.  And another 1.
On top of the Everfrost, an Orc spearman charged forward and stabbed Eofar, the Elven chieftain, inflicting two wounds, with one being soaked.  Eofar's counter-thrust missed the mark.

Turwyn, the Elven swordmaster, leapt forward and scored the first kill of the game.  Bringing his greatsword crashing down on an Orc, he killed the beast instantly, and its lifeless body fell from rocks around the EverFrost.
Turwyn, Elven Swordmaster, vanquishes an Orc that falls dead to the earth next to the EverFrost.
The Goblins' run around the patch woods on the Elf/Dwarf right brought them almost within striking distance of the Dwarven rear, but the Dwarven unit, led by Greybeard the mage, responded with a magic missile.
The closest any Goblin came to a successful flanking maneuver.
One of the Goblins fell to the earth dead, a smoking crater in its chest.
The lead flanking Goblin falls dead, breaking the unit's momentum.
Back on the Elven left, a flurry of arrows brought down one and shook another of the Goblins seeking to charge out of the woods and into the Elven flank.
Accurate Elven arrows repulse a parallel flanking attack on the other side of the field.
Turn 5:

The battle swung toward the Elves and Dwarves.  All Orc and Goblin units that took casualties failed their Spirit checks (morale rolls) and started their flight from the field.  The Orc and Goblin right flank, including their shaman, began to flee.  The two Orcs engaged in combat with the Elven chieftain and swordmaster fell to sword blows as they tried to flee, and Elven arrows rained down on the Orc shaman as he fled, inflicting more wounds on him.
The Orc Shaman flees the field as his retinue broke, only to receive harrying arrow fire as he tries to leave the battle.
Combat on the Elven/Dwarven right proved rather inconclusive, and we decided to call the game at that point.  The Orc shaman was going to either flee the field or be shot down in a hail of Elven arrows in the next turn, either outcome fatal to the Orcs' hopes for victory.
The Orc line breaks and flees the field.
Post-battle impressions:
1.  The Savage Worlds Showdown system works well.  I thought that the bennies (re-roll tokens) would be a nuisance, but the concept has grown on me.  I can see how strategic use of them can really influence the course of a game.
2.  Some models need to have stats adjusted.  The Orcs had a d6 fighting skill, which made hits on some models all but impossible.  Some or all need to be shifted to a d8 fighting skill.
3.  The game was fun, and, with a few more under our belt the system should play pretty quickly.

Sunday, March 20, 2016

Beastmen vs. Wood Elves, Savage Worlds Showdown

We're back, and with a whole new take on fantasy skirmish.  After my somewhat less-than-satisfying experience with my Beastmen vs. Wood Elves in the Song of Blades and Heroes rules, I set out to try the matter again with the Savage Worlds ruleset ... more specifically, with their Showdown rules that take away RPG-useful stats and boil everything down more simply to a tabletop wargame.

Same as last time, I set out three treasure locations, with Elven and Beastmen forces squaring off opposite each other with the prospective treasure locations in between, and each location had a 1/3 chance of being the treasure's hiding spot.  
Layout from the Elves' perspective.  Three prospective treasure sites at the mid-point of the board.
The forces were balanced much differently.  Last time, the Elves were overpriced to the point of being more expensive than the Beastmen.  Not so this time.  A Beastman force of one chieftain and four followers priced out to 105 points.  For 118 points, the Elves had a chieftain and Swordsman (both Wild Cards) and eight archers.
The Beastman force.
The Elven force.  A whole lot more guys than were had under the SoBH system.
So, here goes:

Turn 1:
Beastmen won initiative overall.  I was using Minotaur stats for the Beastmen (which may seem like a bit much, but deal with it), which gave them a Pace (movement) of 8" each, plus a 1d10" if they run.

The Beastmen move distance put two of three of their groups already in contact with the three possible treasure locations.  The Elves opened fire with their bows at this point, all at -2 for their running, and needing a 6+ to hit.

Shooting on the Elven left put four arrows into one of the opposing Beastmen, but none proved effective against the beasts.  Arrow fire on the Elven right proved likewise ineffective.
Both sides advance to the three possible treasure sites.  The Beastmens' superior movement rates takes them up to the treasure sites in two of three cases.
Turn 2:
The Elven right took initiative, putting one successful arrow into a Beastman.  With an astounding series of damage rolls, the beast fell to the ground, out of the fight.  His compatriot (a unit of only two Beastmen) failed his Spirit check and proved Shaken.   The Elven Swordmaster moved forward to take advantage of this and lay the beast low, but was unable to.

The Elven left proved likewise ineffective - the arrows of all Elves (including Eofar, the chieftain, who stayed stationary to gain a +2 aiming advantage but rolled a 1) failed to connect to vulnerable Beastman flesh.

The Beastman chieftain advanced to the center position, while the Beastmen opposite the Elven left were comfortable enough under the hail of ineffective arrow fire to check their possible treasure position and determine that their objective did not contain the treasure trove.

Turn 3:

The Elven left took initiative and a hail of arrows brought one of the opposite Beastmen down.  The sole Beastman remaining opposite the Elven left passed a Spirit check and stayed on the field.
Elven arrows fell one of the two Beastmen on the Elven left.
On the Elven right, the Elven Swordmaster moved into combat with the Beastman at Treasure Site 3.  Using his Improved Flurry trait (two attacks, no penalty) he scored a well-placed blow and laid low his opponent.
The Elven swordmaster bests a beastman.  The battle clearly swings to the Elves.

Strategic view of the battle from the Elves' viewpoint.  Arrows on the Elven left reduce Beastmen while the Elven swordmaster charges forward on the Elven right and slays his remaining opponent.
Things were looking grim for the Beastmen.  Reduced now to 2 out of their original 5, they took a force-wide (if you can call it that) morale check.  I don't see that in the Showdown rules, but it seems a sensible house rule.  The Beastman chieftain passed his check, but the last of his  followers failed his.

At this point, the Beastmen routed and headed for the hills.  The lackey who failed his Spirit roll for a morale check recovered from being Shaken (I may have done this wrong - it may be that he was supposed to stay Shaken the rest of this turn) and rolled a 10 for his run roll, taking him all the way to the edge of the board.  The Beastman chieftain, however, only rolled a 3 and fell victim to a hail of Elven arrows as he fled.  Two connected, one wounded.

Turn 4:

The Beastman chieftain failed to get out of a Shaken state and shambled to the edge of the map while his compatriot successfully fled.  The Elves gave chase and fired arrows as they did so, and with an astounding chain of rolls managed to throw four more wounds into the fleeing Beastman leader.  Wild Cards (Player Characters or champions in Savage Worlds Showdown) only have four wounds, so he was down and out of the fight.  A sweeping victory for the Elves!
Strategic view of the Elven chase of the Beastmen from the field.  A hail of arrows pincushions the Beastman chieftain.
Reverse view of the field from the Beastman chieftain's (corpse's) view.
A few thoughts:
1.  The system is far more nuanced than Song of Blades and Heroes, particularly with regard to missile attacks.  The possibility of exploding dice means that, even with unlikely shots getting through the superior Toughness of the Beastmen, it did happen.  This is realistic and I like it.  

2.  I did the Beastmen a disservice by not placing patches of woods that blocked arrows entirely.  This worked greatly to the Elves' favor.  Will have to keep that in mind in the future, especially when one side is composed almost wholly of archers/missile troops.

3.  The Beastmen stats seem off.  By the math of the game, as I understand it, they should have a Toughness of 8, but the basic book lists them as having a Toughness of 11.  I don't know how it would get there, but it would make sense, as I'm using Minotaur stats.  I'm thinking of changing it back to the suggested numbers, even if they don't add up as I understand them.

4.  To run Savage Worlds Showdown "right" - by which I mean with balanced factions - there's a bit more effort than there is in A Song of Blades and Heroes.  This is partly due to the complexity of the two systems - SoBH is stupid simple, while SW Showdown is near-RPG complex by design.  And it's more complicated by virtue of the fact that the spreadsheet available at Savage Worlds websites is okay for calculating, in broad terms, the value of a full faction.  It isn't great for tableside gameplay.  This (using the provided formulas, with cells switched around) is much more useful:

So, that's where my fantasy skirmish is.  Hope you enjoyed.  I did.

Edited to add;  I didn't use any Bennies (re-rolls, each side gets 3 per 100 points and two per Wild Card).  Had I done so, the Beastmen surely would've used them to Soak wounds and charge into contact with the Elves, and this might have been a different battle entirely.