Sunday, October 20, 2019

Final Assault on Zawiya, 10 March 2011

This battle follows up two previous games I've played in the Libyan Civil War's opening in March of 2011.  In Outskirts of Zawiya, a reinforced platoon of Ghaddafi's loyalist forces rolled toward the rebelling city and mopped up resistance.  In Zawiya City Center, 8 March 2011, the army and rebels fought to a standstill over a contested patch of the cityscape.

In this battle, Ghaddafi's elite Khamis Brigade, along with some regulars from other units, make a push to consolidate control over the rebellious city.  A platoon of government infantry with BMP-1s in support advances into the heart of the contested urban area with several dozen insurgents in opposition.

The Khamis Brigade troops wear red berets, and are Troop Quality d8, Morale d10.  The other government forces are TQ d6, Morale d8.  Son #1 had the government troops and I ran the insurgents.


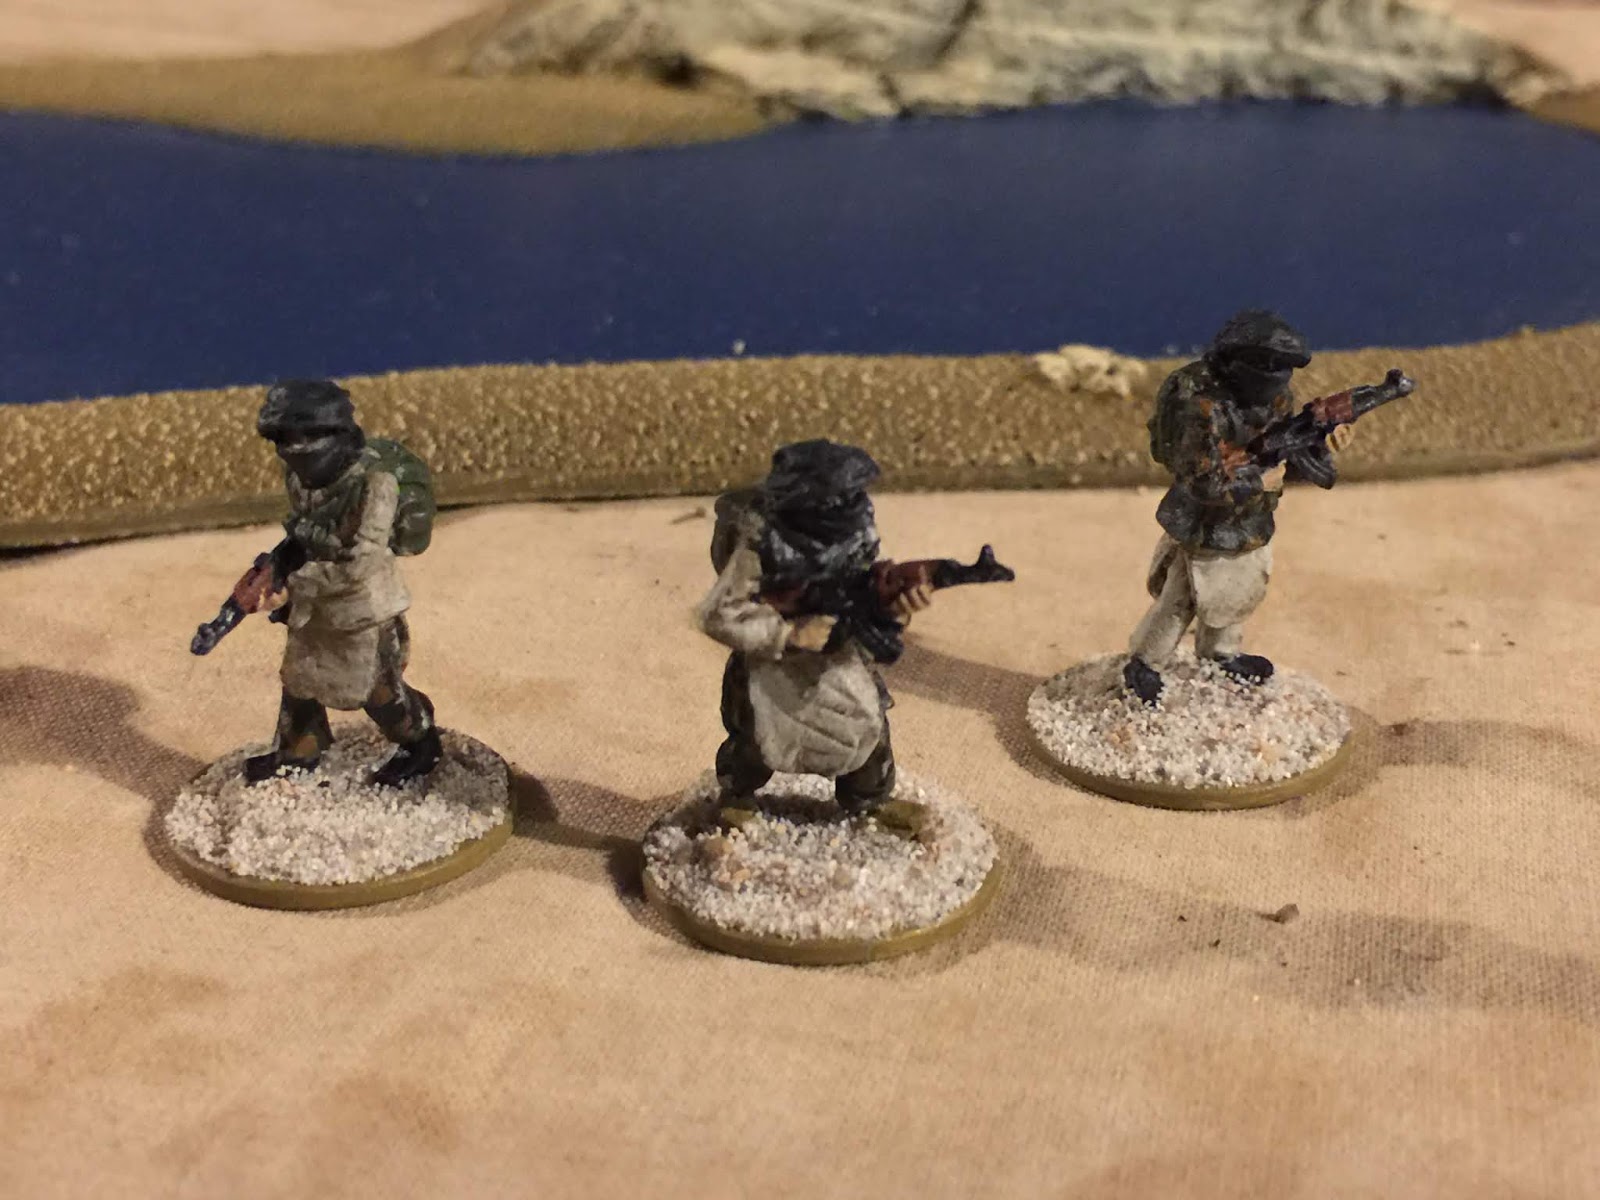
The government forces pose for a platoon photo before they head into the contested neighborhood.


The government forces are off to the races, with Khamis Brigade leaders signaling a general advance.


Insurgents lie in wait.


An insurgent sniper team stands ready to pick off government troops.


A government machine gun team takes to the roof of a building to establish an intermediate support by fire position.


The machine gun team and the snipers lying in wait spot each other, the MG team wins initiative and keeps the snipers either wounded or suppressed.


View from the MG team - insurgent team lying in wait beyond the wall in the distance.


Fog of War card hits the government forces - indirect fire hits a randomized unit...


 ...and the government forces take casualties in their assembly area...


...and insurgent RPG fire is directed at the crucial MG team on the rooftop.


More insurgents advance to counter the government troops.


An insurgent team at the top of the mosque loses initiative and takes a shot from the BMP-1.


Reverse view of the now-remodeled mosque roof.


CASEVAC of the MG team member injured by artillery fire.


The insurgents get hit with a Fog of War card that strips them of artillery support:


Line of sight check on the government left flank.  The insurgents lose the initiative check and take casualties.


Similar results on the government right flank...


Government forces pouring into the neighborhood.


A Fog of War card brings an insurgent MG team into the fight, complete with the Punisher-themed gunner here.


Insurgents race across an alleyway and shed several troops in the process.


A Fog of War card largely neutralizes a key insurgent team.


Government BMP advances with infantry support.


Son #1 talked about moving an MG-heavy squad of Khamis Brigade troops to a roof to establish another intermediate support by fire position.  I was skeptical - I didn't think they would have good line of sight from the proposed position, and I warned him that even if they did, they could end up taking on an overwhelming number of insurgents.

I was wrong.  He put the squad on a rooftop, and they won a series of initiative checks and lay waste to several insurgent teams.


Here's some of their handiwork:


Government forces storm an insurgent position previously neutralized by a Fog of War card.  It's a bloodbath for the insurgents.


Government forces take casualties during their advance.


Two insurgents with RPGs jump out from behind a corner and try to take out a government BMP.  They lose initiative and pay the price.


Government forces turn the corner and open up their advance on the left flank.  Insurgent forces have been largely broken by this point.


To add insult to injury, a Fog of War card gives the government forces a T-72 main battle tank.  At this point, we called the game, with the insurgents having been pushed out of the neighborhood.


The dead insurgents stacked up...


This game went a bit differently than I expected, but we had a great time and it largely reflected what happened in the early phases of the Libyan Civil War.

Monday, March 18, 2019

Elhiem Elite Taliban and RPG Gunners Painted

I’ve got a couple of games played and awaiting write-ups, but haven’t found the time to get them done. In the meantime, here’s some pics of some Elhiem minis I’ve painted, I think they came out rather well:


Hope to get the battles they fought in posted soon. Stay tuned!

Friday, February 15, 2019

Risk: Europe Playtest

Was happy to get Risk:  Europe for my boys this Christmas, and we broke it out and kicked the proverbial tires.


This guy looks ready to invade.

My boys have played Medieval:  Total War II a fair amount, so this was historically familiar to them.  There's already an excellent write-up over at The Stronghold Rebuilt on the miniatures, so if you want to use the included four factions of medieval miniatures in about 1/72 or 20mm, go check that out.

The basics:  Four factions fight for control of a map of Europe with major cities giving certain advantages in income when taxed, levying troops, or other resource management buffs.  The game runs until one player gets the requisite number of crowns for owning capital cities such as London, Paris, Madrid, etc.

The game incorporates four troop types - infantry, archers, cavalry, and siege machines.  The latter three go earlier in sequence during a combat and can whittle away your foes' troops before the infantry combat takes place along familiar Risk 3 attackers versus 2 defender dice rolls, with ties going to the defender.  Provinces with castles can only be attacked by armies that contain a siege machine, and siege machines are of course the most expensive troop type to stand up.

We played with three players, and the rules tell you that in such instances the fourth army must be fielded, but as a mercenary faction.  Players bid to control the mercenary faction, forcing them to balance their own force requirements versus the advantage of controlling an x-factor ally.

I recommend following this rule.  We didn't field the mercenary faction, just so we could learn the rules, and quickly saw that the board really does need all four factions for the game to balance correctly.

Game in progress.  At left is the ladder of crowns that players climb in terms of crowns that they've won.  I'm playing Orange, Son 1 is Purple, and Son 2 is Green.  You can see that by now players have bought siege machines and are lining up to invade provinces with castles.

We played for several hours in some back-and-forth exchanges over contested provinces.  We all had fun and want to dive back into the game.

Impressions:
- If you ever wanted an analog version of Medieval:  Total War, this is your game.
- The rules are great.  The crown cities all add buffs that facilitate resource management decisions and sharp competition between players.  The combat rules provide a stripped-down yet elegant medieval combat system.  With some command rules or activation mechanics added on, this could seriously be the basis of a wargame not on a Risk board but on a large gaming table.
- This is a gateway drug for getting your friends into wargaming.  A nuanced version of a game that they already know that could definitely lead them into other tabletop strategy games.

Saturday, February 9, 2019

40k with the Family

Made a family trip back home, which gave my boys a chance to play some Warhammer 40k with their cousins, my brother's boys.  My boys have slowly developing Black Templar and Ultramarine 40k armies, while their oldest cousin has a large collection of Eldar and Harlequin forces.  The boys also used this opportunity to exchange gifts with their cousins, which of course included 40k units for each other.

So we all journeyed down to my nephews' friendly local gaming store for a battle.  My boys don't have enough for either of them to field a full army, so they combined their chapters' forces into what I'll call Task Force Black and Blue.  Their cousin fielded a mass of very well-painted Harlequins.  TF Black and Blue hoped to shoot down the Harlequins before they could close the distance and tear marines limb from limb.

The only slightly unfortunate part about this was the table.  We ended up on a large table with a painted background, so please excuse the surface in the shots below.

Overhead view - TF Black and Blue at near end, Harlequins at far end of table.

Harlequins advancing on hover bikes.

More hover riders, with a small horde of foot troops behind.

TF Black and Blue takes defensive positions.

Boy 1's new Redemptor Dreadnought lines up to take a shot.  He proved somewhat effective, but some bad dice plagued his employment of his Heavy Onslaught Gatling Gun.

Ultramarines disembark from their Rhino and prepare to engage the onrushing Harlequin menace.

Black Templar dreadnoughts and Primaris forces form a firing line to hope to reduce the Harlequin skimmers at top end of frame.

Things get nasty in the middle as  large scrum develops, drawing in about a third of each side.  Plenty of casualties.  Note the magnificent Harlequin minis, with swirls of cards around them. 

The Harlequins advance in and wrap around both the Ultramarine tactical squad and their Rhino.  The tactical squad would ultimately get wiped out.  The Primaris Aggressors at top of frame proved highly effective, wiping out some Harlequin units that charged them.  If playing against a melee-heavy force, the Flamestorm Gauntlets work well - they hit automatically as the enemy charges.

On the Marine left, the weight of fire ultimately destroyed the advancing Harlequin skimmer fleet.

The Marines held their ground, albeit with some substantial casualties on their right flank.  All in all, a good game and certainly one that will help keep the next generation of wargamers excited about painting and playing in the future.

Saturday, February 2, 2019

Sadr City Showdown

Baghdad, 2005.  The occupation of Iraq has soured and Sadr City has fallen under control of the Mahdi Militia and the political machinations of Muqtada al-Sadr.  A slightly understrength US infantry platoon is attempting to retake some lost ground from the militia forces and kill or capture this vaguely Usama-looking fellow:
He's in the compound at top right of the map below, and the US forces start at the bottom.  Militia cells stand between the US forces and victory.

The view from the US staging area.
US troops secure a building in anticipation of the advance.
The militia headquarters compound.
A militia cell got spotted by US troops on a rooftop, and promptly dropped to American fire.
An insurgent cell lays shot up in the foreground after losing an initiative roll and getting pasted by the Americans.
Another insurgent cell bites the dust.
The two Humvees reinforcing the US troops rush forward, perhaps recklessly, to engage a courtyard full of insurgents in a courtyard.
The Humvee gambit works, but one is at half mobility and the other at half firepower.
The Americans, having run out of people to shoot for now, rush toward their objective. 
Aerial view of the American advance.
Insurgents rush from their headquarters to take up a better defensive position, but there's a US Humvee at the far end of the street...
The insurgents lose initiative, and are lucky to lose only one man to the .50 caliber fire.
The insurgents completed their run across the street, but they roll some ones on their morale check - this causes additional shrinkage of two more insurgents who decide they have a better place to be and are taken off the board.  The cell is also frozen due to a failed morale check.  Did I mention that the insurgents have failed pretty much every roll this game?
Collateral damage.  A pickup truck goes up in the exchange of fire.
The Americans set up the Humvees in overwatch on their leftmost axis of advance and start to push to their objective.
The building at left of shot fills up with newly arrived insurgents...
...who fail an initiative roll against the Americans and are promptly gunned down.
On the American right, a fire team mounts the roof of a building and goes into overwatch to cover the fire team advancing to the objective building at the rear of the shot.
Another insurgent cell spawns behind the building on the left flank, the same building where their comrades were just shot to pieces...
...and they also fail an initiative roll and get wiped out by point blank .50 caliber fire and a fire team  of Americans.
Then the Americans pull a Fog of War card that gives them a reinforcing special ops team, which they place on the roof where a fire team is already providing overwatch.
The overwatch position gets line of sight on the leadership cell in the objective building, and with the additional firepower of the Troop Quality d10 special ops team, promptly wipes out the Mahdi militia leadership cell.

Well, I've never seen so one-sided a game.  Every die roll, from reinforcements to initiative to shooting, went the Americans' way.  The boys playing had a good time, but I'll have to recalibrate this scenario if we play it again.

If you want to see a library of other games set in Iraq that aren't so one-sided, check out my Force on Force:  Iraq page, where I've already added this game.