The boys and I had occasion to play a little game of Force on Force. We set up an expanded version of Contracting Trouble, the ubiquitous FoF scenario that is very evenly balanced and has been played and written up by a number of folks: Donogh, Donogh redux, von Lucky, Dan, and Dave.
An SUV carrying two civilian contractors was hit by gunfire as it moved through a neighborhood in one of the city’s red zones. UAV footage indicates that the contractors are injured but alive. The contractors have held the small group of Insurgent gunmen who attacked their vehicle at bay for nearly a quarter of an hour, but more armed men have been spotted converging on the disabled SUV. .
A force of US soldiers are en route to save the contractors. US troops are Troop Quality d8, Morale d10. Iraqi insurgents are TQ d6, Morale d10.
 |
| The two hapless security contractors who find themselves on the wrong side of the tracks. |
 |
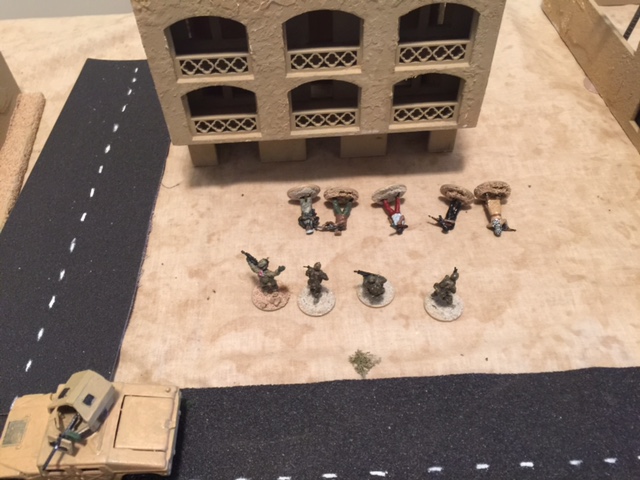
| View zoomed out slightly. A group of insurgents visible at right, preventing the contractors' departure from a bad situation. |
 |
| Zoomed all the way out. US troops advancing to rescue the contractors from right edge of the table. |
The US troops have two squads, each escorting an uparmored HMMWV equipped with a .50 caliber machine gun. Each squad is advancing down one of the roads running the long axis of the board to effect the contractors' rescue.
 |
| Looking down the 1st Squad's axis of advance. |
 |
| 2nd Squad's view. |
2nd squad started things off, advancing and exchanging fire with a group of insurgents. Right off the bat, the luck of youth struck as they drew a Fog of War Card and picked up a team of TQ d10/Morale d10 special operators.
 |
| Four operators drop in to help the Americans. A harbinger of things to come... none good for the insurgents. |
Following the windfall of the operators' arrival, the Americans trounce the insurgents in a series of one-sided exchanges of fire.
 |
| Insurgents firing at the advancing Americans from the doorways of a nearby building. |
 |
| Same insurgents, building lifted away for ease of administration as they take casualties and fail their morale check. |
 |
| Insurgents in a mosque take casualties and likewise fail a morale check. |
 |
| One of 2nd squad's fire teams advances within line of sight of some waiting insurgents. |
 |
| Another insurgent element takes casualties and fails morale. |
 |
| Another group of insurgents move out of cover into to engage 2nd squad and a couple of them go down for the count. The survivors retreated back to cover as a result. |
Some insurgents pop out of a compound down the road from 1st squad and lose a couple of men to .50 caliber fire. They wisely retreat back to cover.
Not everything went poorly for the insurgents... they got reinforced by a technical from a Fog of War card.
 |
| Add caption |
As the first turn wrapped up, everything was coming up roses for the Americans. That was about to change, at least a little.
 |
| One of 1st squad's fire teams rushes from cover and into the open courtyard between buildings... |
 |
| ...hoping to get some shots in at insurgents next the building at the far end of this shot... |
|
| ...and takes two casualties. They inflicted a couple of casualties on the insurgents as well. |
 |
| Reverse angle shot - one of 2nd squad's fire teams makes a rapid move to try to get the same insurgent cell's flank. |
 |
| Not to be outdone, the HMMWV moving alongside 2nd squad races up and blasts at the same insurgent cell with its .50 caliber MG. |
 |
| A fire team from 2nd squad prepares to assault the shaken insurgents on the rooftop. |
 |
| The trusty SOF team that dropped by to lend a hand finishes off the insurgents in the Mosque. |
 |
| The HMMWV accompanying 1st squad races forward. |
 |
| As it does so, the insurgent technical gets line of sight on the advancing American vehicle. |
View from the technical gunner's position.
In the ensuing exchange of fire, the technical's PKM fire failed to do anything but annoy the .50 caliber gunner on the HMMWV, which responded by putting the PKM out of commission.
As the third turn started, the US troops began to cement their control of the few blocks of urban terrain they were fighting over.
The trail fire team for 1st squad sprints past the open area between buildings (bottom of picture) and takes fire from the last insurgent in the courtyard that everyone is trying to kill. They win initiative and put him down for the count.
US view of the exchange of fire.
As this was going on, the US fire team from 2nd squad that stacked at the bottom of the stairs in the courtyard in preparation for assaulting a broken insurgent cell made its move.
It's a clean sweep in the house, but the American close combat victory comes at a price - a Fog of War card that reduces each element's firepower by one die due to low ammunition supplies.
Not fellows to be brought down by a negative Fog of War card, the boys promptly roll a '1' for initiative in the next exchange of fire and get a sniper team.
Meanwhile, the uparmored HMMWV that raced ahead to the objective pulled right up to provide covering fire for the contractors' egress, only have the crew become suppressed by a swarm of small arms fire.
2nd Squad continued to clean things up on the American right flank, rushing a building holding an insurgent cell previously broken by US fire. It's another clean sweep in close combat (building lifted away for ease of administering the battle).
As small arms fights raged on the flank, the HMMWV on 2nd squad's side of the table raced forward to engage the dismounted crew from the insurgent technical. The insurgents won initiative and made a run for a nearby building...
...which didn't do much to save this fellow.
Back at the other HMMWV's position, more insurgents popped up to fire at the American vehicle, scoring an immobilization (HMMWV turret visible in background). The American return fire proved too much, though, as they lost one insurgent and the fire from a heavy weapon caused 'shrinkage' of one more - a roll of a 1 on a morale check causes an irregular fighter to flee the fight (running fighter visible in foreground).
But this was all prelude to the last insurgent cell I was controlling. After exhausting the lead HMMWV's firepower dice responding to other insurgent cells' small arms, and immobilizing the vehicle, I sprung the RPG-equipped cell to take down the vehicle next to the contractors' position...
...aaaaand they missed. Explosion next to the vehicle.
Overhead view. HMMWV immobilized but still providing firepower to the Americans.
As the fourth turn kicked off, the US infantry got back into the fight with a shoulder-fired AT-4 fired at the insurgent rooftop position firing at the immobilized HMMWV.
 |
| "Backblast area clear!" |
View of the insurgent position targeted with the AT-4. Nobody left after this one. While this was going on, the US infantry moved forward to collect the contractors, but none could get far enough down the field to affect the remaining insurgent positions.
Success! The insurgent RPG crew finally scores paydirt and destroys the HMMWV next to the contractors' position...
...but, of course, the crew all make their casualty checks and dismount the vehicle in time to move to cover.
By this time, the contractors had decamped the ruined building in which they had taken cover and loaded up in the back of the intact HMMWV.
By this point, the US SOF team had advanced far enough forward to engage the insurgent RPG cell with small arms fire, inflicting a few casualties. The insurgents passed their morale check but could not put effective fire on the American operators.
As this was going down, insurgent reinforcements soon found themselves flanked and taking fire from a supporting US fire team. None of the insurgents would survive the American volley.
And as the next turn started, the insurgent RPG cell took a collective dirt nap as the American SOF operators closed the deal with their opponents.
At this point, we called it a game as the boys had largely eliminated insurgent resistance.
A fun game, if a bit one-sided. I've added it to the
Force on Force: Iraq campaign page. Hope you enjoyed.